
I often start my generative work with a question about how to create something. This time, I asked myself how to generate a random scribble. I decided to use a random walker algorithm with arcs for its paths. In this post, I'll explain the process of making the algorithm and how I turned it into a generative artwork.
What is a 'Random walker'?
Wikipedia has a nice explanation:
"In mathematics, a random walk is a random process that describes a path that consists of a succession of random steps on some mathematical space.” Source: Wikipedia
In other words, a random walker is a path that is created step-by-step where each step has been taken randomly. The idea is simple, start somewhere and then randomly move (walk) to a next point. Repeat this process and eventually the canvas will be filled with a random path. There are a lot of generative artist/teachers out there who have explained more about this topic. See for example this video from The Nature of Code by Daniel Shiffman or this Happy Coding webpage by Kevin Workman.
Getting started
I started sketching out how the algorithm could draw a single arc and start 'walking' from there. The algorithm would need to execute the following steps:
- Generate an initial arc with a (random) postion, start & end angle
- Find the end point of the previous generated arc
- Calculate a new random arc turning left or right joining the end point
- Repeat steps 2 & 3
Setting up
I use Processing Java for most of my generative design work. Java is an object-oriented programming language which means that you use a lot of classes. Classes are basically ‘blueprints’ for objects that you use in your code. For the ‘Warcler’ algorithm I created a class for the step - the arc. It looked something like below. With this blueprint I can create an arc by specifying its center position, radius and start and end angles.
class Arc {

  PVector center;
  PVector start, end;
  float startAngle, endAngle;
  float radius;

  Arc ( PVector _pos, float _r, float _startAngle, float _endAngle) {
    center =  _pos;
    radius = _r;
    startAngle = _startAngle;
    endAngle = _endAngle;

    start = new PVector(
      center.x + cos(startAngle) * radius,
      center.y + sin(startAngle) * radius
    );

    end = new PVector(
      center.x + cos(endAngle) * radius,
      center.y + sin(endAngle) * radius
    );

  }

  void style () { ... }
  void draw () { ... }
  void guides () { ... }

}
The arc class in Processing Java code
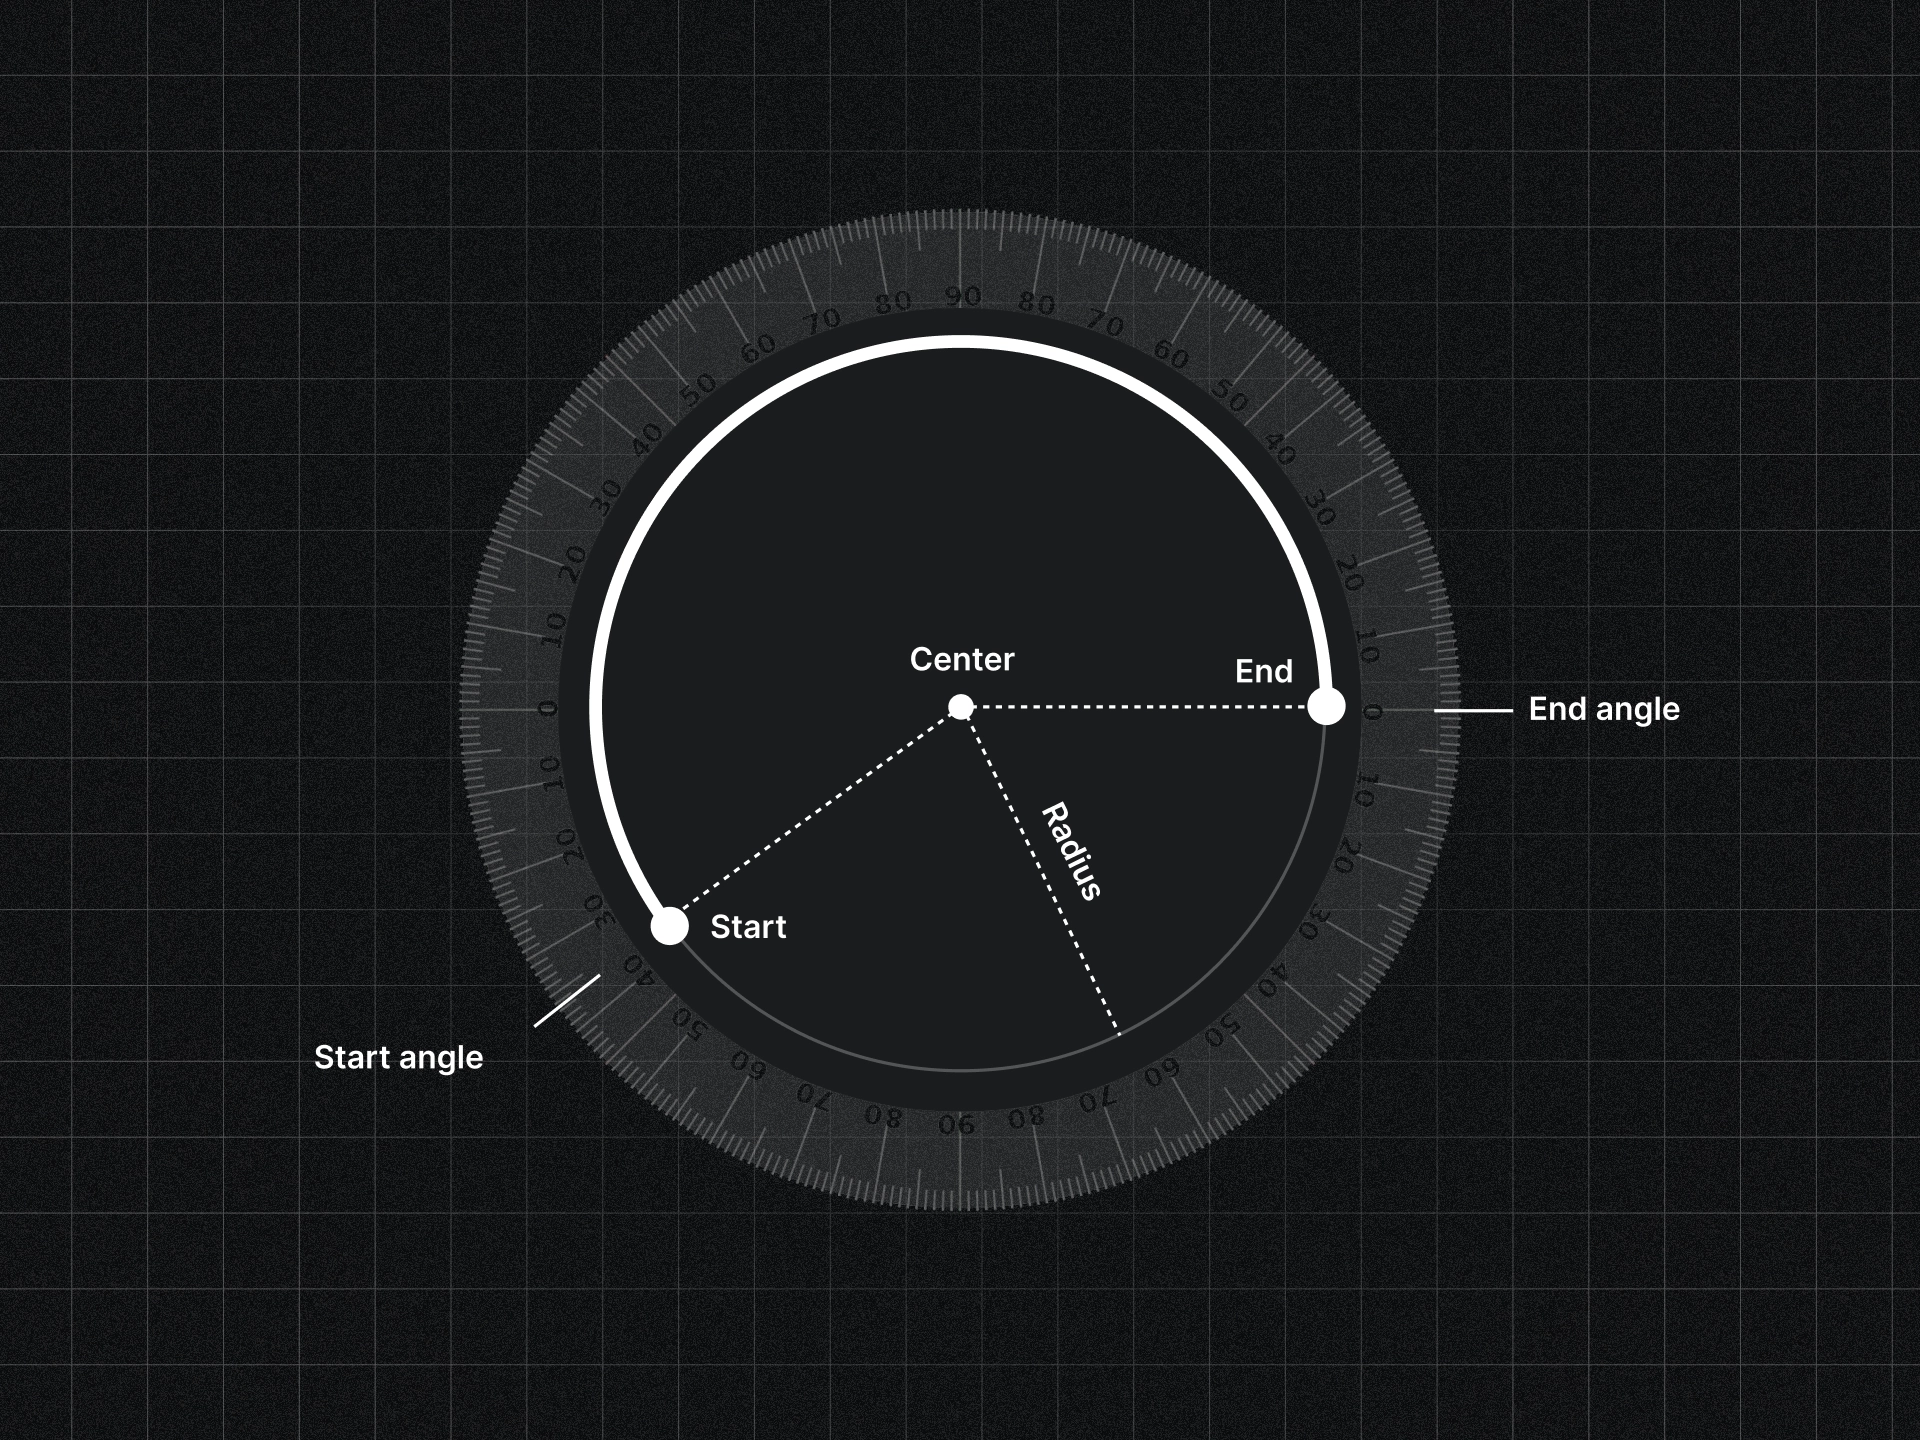 Visualisation of the arc class and its properties
Next I created a Walker class that uses the Arc class and actually handles the walking functionality. This class starts with generating an initial arc. Then it generates the next step based on the previous (arc) step. The calculation of finding the next arc looks something like below:
Arc calculateNextArc (Arc _prevArc) {

  // Define properties for new arc
  float newRadius = random(minRadius, maxRadius);
  float angleChange = random(minAngle, maxAngle);

  // Direction from center to end
  PVector dir = PVector.sub(_prevArc.end, _prevArc.center);
  dir.setMag(newRadius);

  // Possible left or right arc center points
  PVector left, right;

  if (_arc.clockwise) {
    // CLOCKWISE
    left = PVector.add(_prevArc.end, dir);
    right = PVector.sub(_prevArc.end, dir);

    if (random(1) > 0.5) {
      // Rotate left (counter clockwise)
      float angle = _prevArc.endAngle + PI;
      return new Arc(left, newRadius, angle, angle - angleChange);
    } else {
      // Rotate right (clockwise)
      float angle = _prevArc.endAngle;
      return new Arc(right, newRadius, angle, angle + angleChange);
    }
  } else {
    // COUNTER CLOCKWISE
    // If counter clockwise we need to flip the starting angle for left and right
    left = PVector.sub(_prevArc.end, dir);
    right = PVector.add(_prevArc.end, dir);

    if (random(1) > 0.5) {
      // Rotate left (counter clockwise)
      float angle = _prevArc.endAngle;
      return new Arc(left, newRadius, angle, angle - angleChange);
    } else {
      // Rotate right (clockwise)
      float angle = _prevArc.endAngle + PI;
      return new Arc(right, newRadius, angle, angle + angleChange);
    }
  }
}
The 'calculateNextArc' function receives the last generated arc. It reads info about the arc’s location, radius, angles and if its drawn clockwise or not. Then it calculates possible left or right center points for the new arc. It uses some vector math combined with several if statements. If you want to know more about vector math check out the previously mentioned The Nature of Code by Daniel Shiffman. Lastly the function tosses a coin to decide if the walker will turn left or right and create the next arc. Repeat this function a couple of times and you get a random walker graphic.
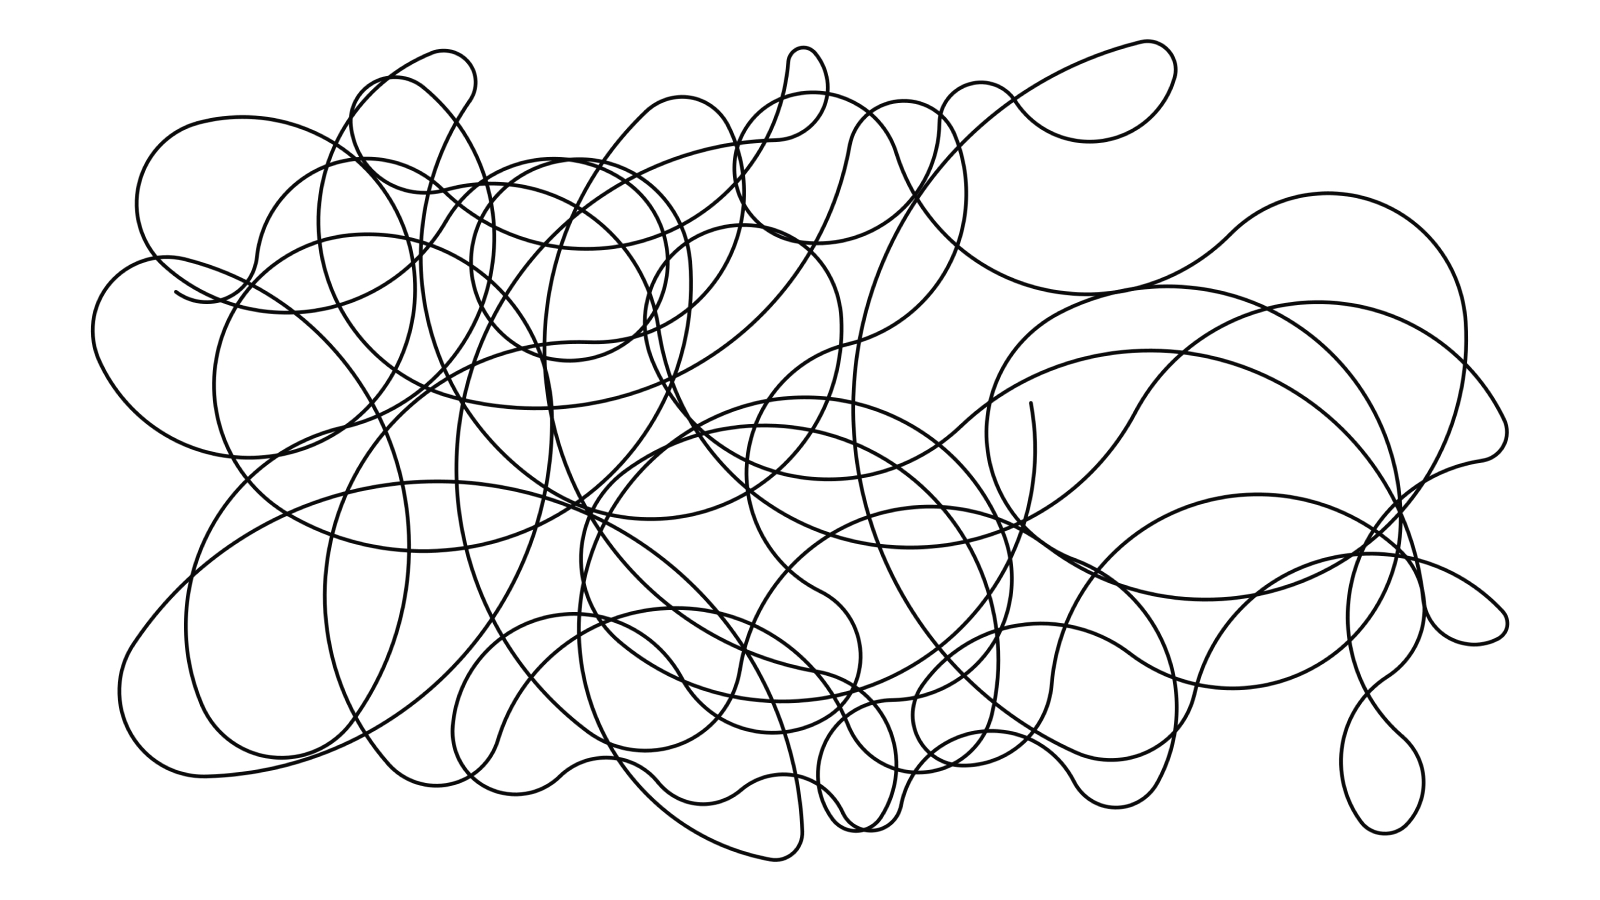
 First results of a random walker with arc paths
Keep it contained
I didn't like that I had little control over the direction of the random walker and that it could leave the canvas bounds. To address this, I wanted to hold the random walker inside a rectangular container. My first approach was to have the random walker always walk towards a target point, which would change over time and stay within the given boundary. However, the downside of this approach was that the walker could still get out of bounds when its radius was larger than its distance to the closest edge of the canvas. Thus, I decided to pursue another path…
Walker that moves towards a random target point
More checks
I had to make the algorithm smarter, so I introduced more checks. I created four direction guides (forward, backward, left, and right) coming out of the end point of the previous arc. For each direction, I adjusted its length when it hit the rectangular boundary, giving me more control over choosing a left or right arc and specifying a radius that wouldn’t extend the boundary. Additionally, because I already had a forward direction, I could calculate angles towards the intersecting edge to see if there was more space on the left or right side of the direction. Combining these methods, plus a few more checks, helped me create a random walker that stayed inside a rectangular boundary. Looking back, I implemented something that looks like Raycasting. I plan to look into that some day.
Warcler debug view including directional guides, distances towards edges, angles & radii
Testing the algorithm
I sell personalized outputs of my algorithms as fine art prints. You can feed the algorithm your personal input and it will generate an edition specifically for you. The input can be anything as long as it is text-based. Think of a special date, a birthday, a coordinate, or the name of your pet - you name it ;) Before I release my algorithms on my webshop, I test them with various inputs. In the past, I used random numbers for this, but they don't have much significance since they're random.
During the Warcler project, I created a small library with all kinds of interesting inputs that I could use for testing. For this, I asked a conversational AI to generate lists of coordinates of places, famous people, pet names, and so on. When testing, I feed these inputs to the algorithm, and the outputs immediately take on special meaning because they are tied to, for example, a famous person like Shakespeare.
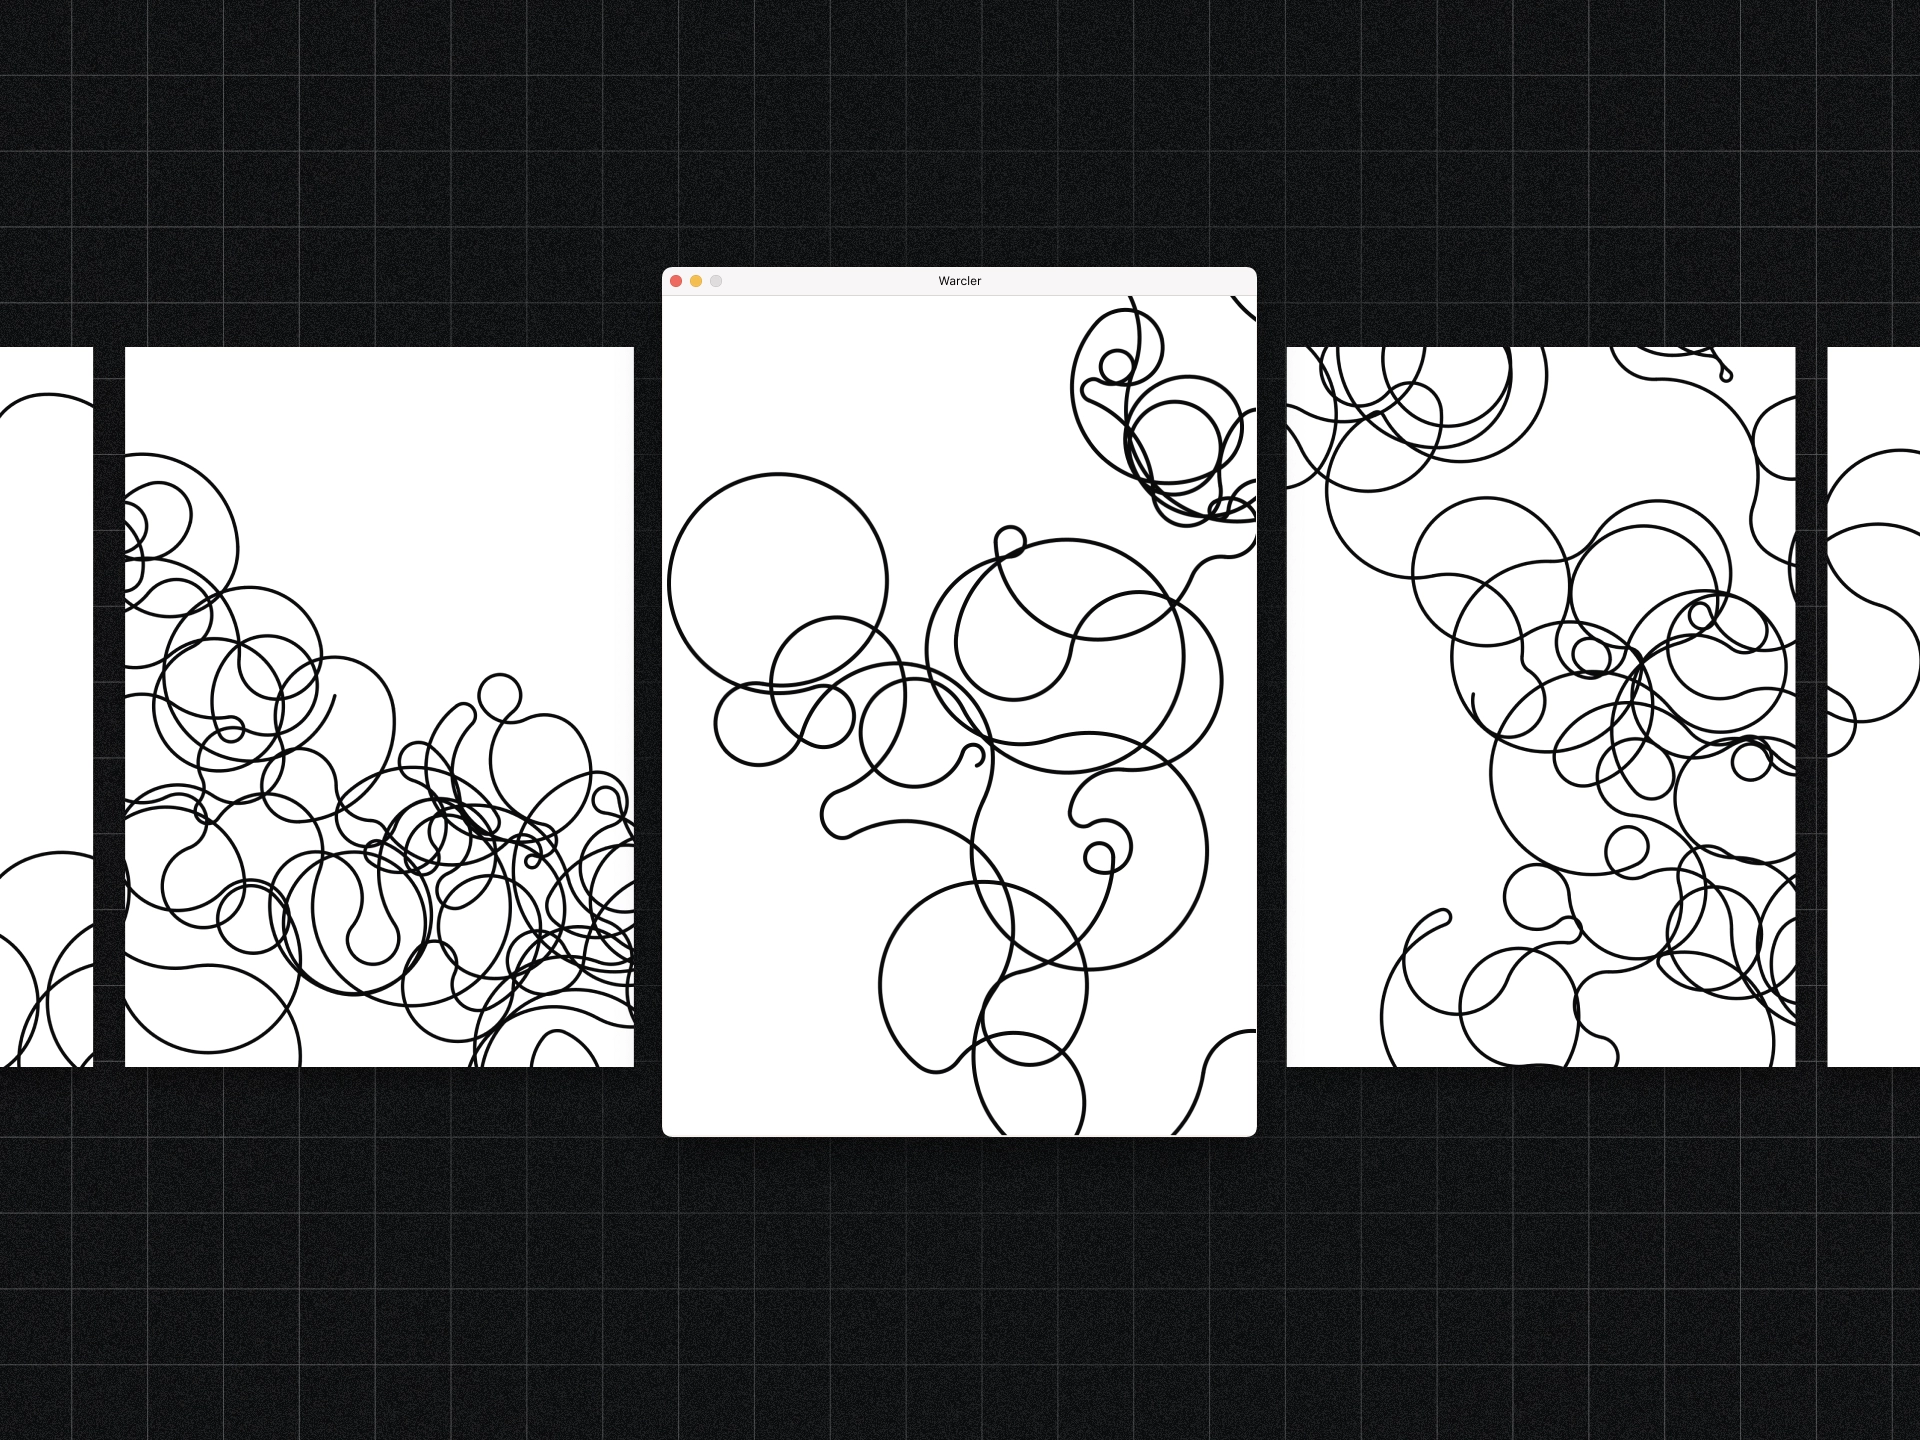
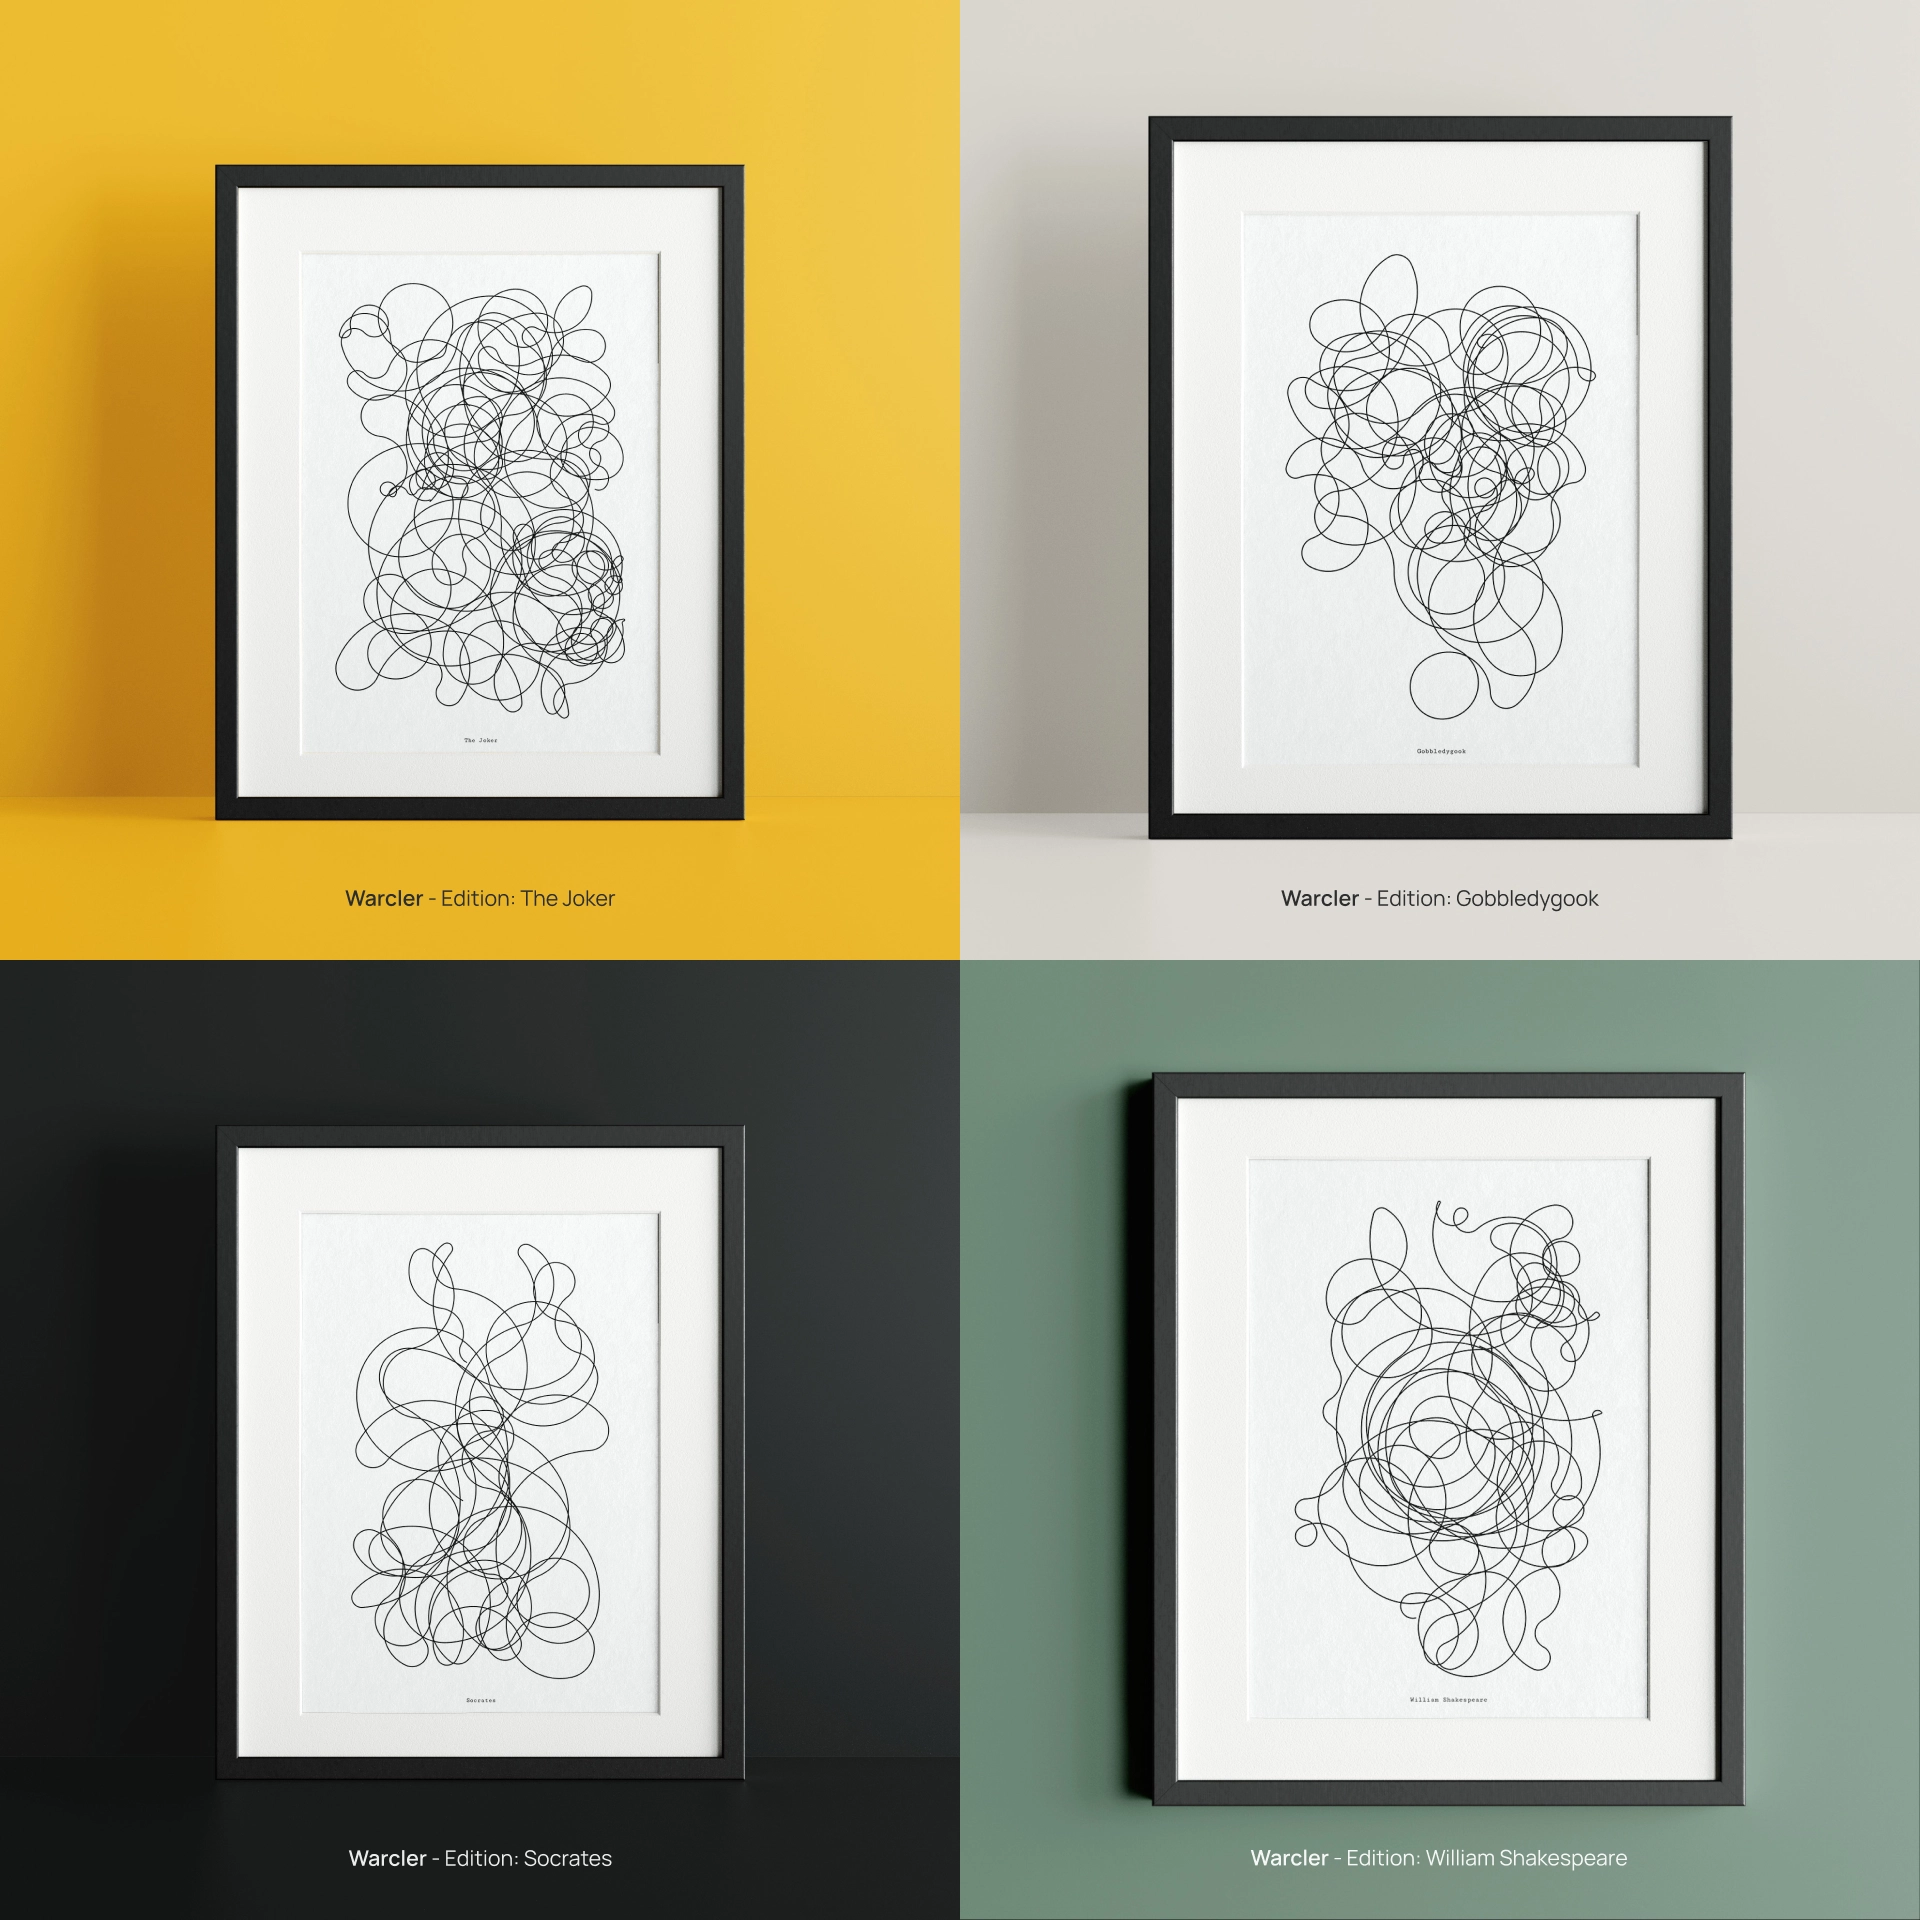 Four editions generated by the Warcler algorithm. Each edition is generated based on a textual input. From left to right and from top to bottom: 'The Joker', 'Gobbledygook', 'Socrates' and 'William Shakespeare'.
Adding motion
To inform the public about my art, I like to make social posts of mockups, behind-the-scenes shots, and animations. Generative design/art is great because it can be influenced as it is drawn to the screen. Instead of drawing the graphic all at once, I can draw parts of it frame-by-frame, creating an animation. I used this technique for the Warcler algorithm in some social posts, and I plan to do this more often as it brings my work to life.
Animations of several Warcler editions
Finishing thoughts
The cool thing about this algorithm is that I got it working pretty fast but that I spent a lot of time trying to keep the scribble contained within a boundary. I learned that when a page of code becomes very long and complex, it's best to split it up into separate parts. From now on when I'm working with classes, I try to keep them as focused as possible, and if I need new functionality, I create a new class for that.
I hope you’ve learned something about the work that gets into the artwork. If you have any questions or remarks please let me know via socials or DM ;)
Get your personalised edition of the Warcler algorithm via my shop. Cheers!